Stripe
Hurdlr recognizes that payment processing is critical to the business model of many FinTechs. As such, the Hurdlr API allows you to connect your own Stripe platform account, so that you own the relationship between your customer and Stripe, including any associated economic benefits.
1. How it works
Hurdlr's Invoicing API makes it easy for your team to provide invoicing functionality to your users, and your users can collect payments via the payment rails of your choosing. When leveraging Hurdlr's Stripe integration, your users will be able to collect payments from their clients via credit card or ACH, and your development team will not need to do any Stripe-specific development.
2. Getting started
If you haven't already done so, you should create a Stripe account for your company/app.
3. Enable Stripe Connect
Stripe Connect is what allows your app to facilitate payments so that your customers can accept invoice payments from their clients. After you have created your Stripe account, you will want to enable Stripe Connect, by visiting the Connect tab of your Stripe dashboard.
Once you have activated Stripe Connect, you should navigate to the Connect settings screen where you will be prompted to enter company-specific info, including your brand colors.
Once done, you should scroll down to the Integration section. On the top right of the header, you can click "Test mode", to toggle into the sandbox environment.
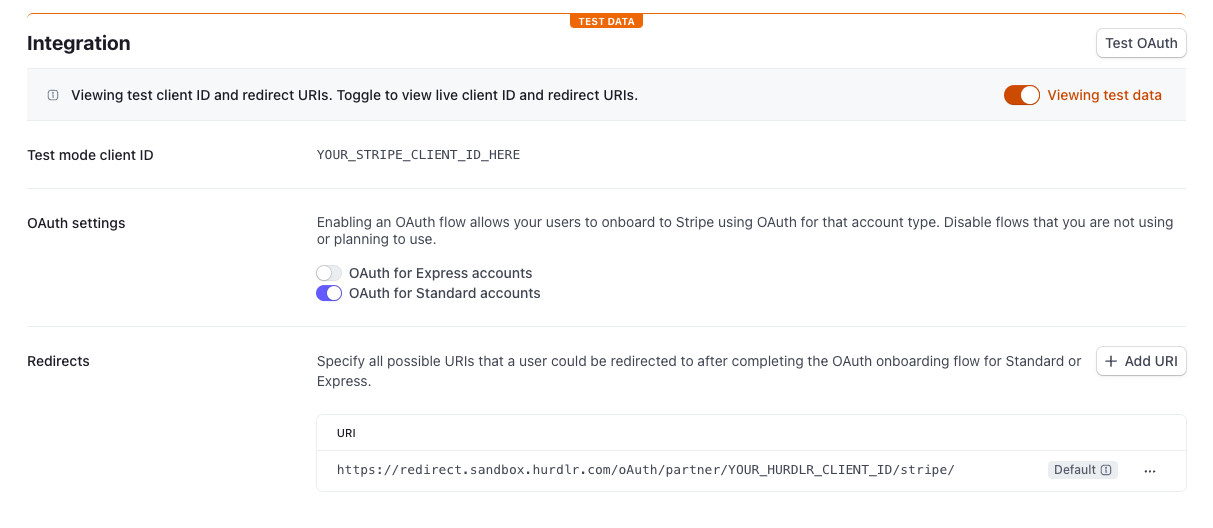
Under "OAuth settings", you should enable "OAuth for Standard accounts". Under "Redirects", you should add https://redirect.sandbox.hurdlr.com/oAuth/partner/YOUR_HURDLR_CLIENT_ID/stripe/.
Please note down the "Test mode client ID".
Once you are ready to go live in in the "Production" environment, on the top right of the header, you can disable the "Test mode" toggle, and repeat the above steps. Under "Redirects", you should add https://redirect.prod.hurdlr.com/oAuth/partner/YOUR_HURDLR_CLIENT_ID/stripe/.
4. Securely share your Stripe keys
The last field that is needed is a "Secret key", which you can find on the API keys page. Under the "Standard keys" section, you will see a "Secret key" row. You should note down the token field for the Secret key.
Contact us directly at [email protected] for instructions on how to securely share:
A. the Secret key token above
B. the Test mode client ID that you noted down at the end of Step 3
5. List your app on the Stripe App Marketplace (optional)
While completing the previous steps are enough to quickly launch your Stripe integration, if you intend to list your app on the Stripe App Marketplace, you will need to implement an OAuth Registration endpoint. When a prospective user finds your app on the Stripe App Marketplace, they will be able to install your app for the first time, which will automatically register them for your app without them needing to manually fill out any info.
- When the user installs your app from the Stripe App Marketplace, the Hurdlr API will POST relevant user information to the OAuth Registration URL of your choosing.
- Upon receiving this user information, your server should parse the user information and determine whether the user has already created an account with your app.
- If the user already has an account, you can simply respond to the POST request with the
redirect_urirepresenting where the user should be routed. - If the user hasn't created an account yet, you should create an account for the user using the information provided in the POST body. You will also want to register the user with the Hurdlr API.
- Once done, you should respond to the POST request with the Hurdlr
access_tokenand theredirect_urirepresenting where the user should be routed once the Stripe App Marketplace registration flow is complete.
6. Next steps
It's as simple as that! Now your customers will be able to receive payments via credit card or ACH. If you have not already implemented the Hurdlr Invoicing API nor embedded the Invoice Dashboard into your product, that is a great next step.
Updated 2 months ago